iMovie can use any picture that has been imported into iPhoto. In fact, importing the image into iPhoto first is mandatory — so if you haven’t imported your still graphics into iPhoto (as described in the previous section), do so now. When that’s done, you can start using still images in iMovie:
- Open iMovie and the movie project in which you want to use a still image.
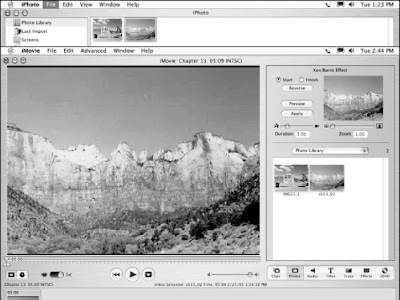
- Click the Photos button. A collection of pictures that looks eerily similar to your iPhoto library will appear in the iMovie window.If you’ve gone to the trouble of organizing photos into different albums in iPhoto, you can switch between those albums using the menu above the image browser.
- Click the clip that you want to use in the movie to select it.
- Adjust the duration of the clip using the duration slider, which bears the images of a little tortoise and hare. The default duration for a still clip is five seconds, but if you want it to display for less time, move the slider towards the bunny, er, I mean hare. If you want the clip to appear slow and steady, move the slider towards the tortoise. At about this time, you’ll probably notice that your still graphic is moving in that little preview window in the upper-right corner of the screen. You’ll also notice the words “Ken Burns Effect” just above. No, the Ken Burns Effect doesn’t make Ken’s smiling mug appear in your movie. It makes the camera appear to slowly zoom in or out on the still image, providing a visual continuity of movement that is otherwise broken by using a still image amongst moving video clips. (Ken Burns, the well-known documentary filmmaker responsible for such films as The Civil War, uses this trademark effect in a lot of his films.)
- Click the Start radio button near the top of the screen. This allows you to adjust the zoom level at the beginning of the clip.
- Adjust the zoom slider. If you don’t want to zoom in on the image at all, drag the slider all the way to the left so that the zoom factor says 1.00.
- Click the Finish radio button near the top of the screen. This allows you to adjust the zoom level at the end of the clip.
- Adjust the zoom slider again. If you don’t want to use a “Ken Burns” zooming effect, make sure that the zoom factor at the Start and Finish of the clip are the same.
- Click Preview to preview the results of the effect. If you aren’t happy with the effect, continue tweaking the zoom settings and previewing the results.
- When you’re done making adjustments, drag the clip and drop it down on the timeline or storyboard to insert it in your movie.
You can still adjust clips after they have been dropped into the timeline or storyboard. Select the clip, click the Photos button, and then adjust the duration or other attributes in the Photos panel. Click Apply when you’re done making changes.

 iMovie can use any picture that has been imported into iPhoto. In fact, importing the image into iPhoto first is mandatory — so if you haven’t imported your still graphics into iPhoto (as described in the previous section), do so now. When that’s done, you can start using still images in iMovie:


