Working with sound effects

on Tuesday, March 31, 2009


Sound effects can really separate a good movie from a great movie. I suggested that if a picture is worth a thousand words, sometimes a sound is worth a thousand pictures. Consider how various sound effects can affect the mood of a scene:
  • A quiet room somehow seems even quieter if you can hear the subtle ticking of a clock.
  • Applause, cheering, or laughter suggest how the viewer should feel about an event in the movie.
  • Chirping birds suggest peace and serenity.
  • Footsteps make movement seem more real, even when the feet are not shown in the video image.
Those are just a few examples, but you get the idea. You can create and record your own sound effects if you want. Fortunately, most video-editing programs now come with ready-to-use libraries of common sound effects to enhance your movie projects.

Adjusting volume dynamically

on

Believe it or not, I very seldom adjust the overall volume of an entire clip or track. Usually I prefer to adjust volume dynamically throughout the clip. Adjusting volume dynamically allows me to fine-tune audio to better match other things that are going on in the project. I adjust volume dynamically at times like these:
  • Narration is about to begin: I may reduce the volume of background music a bit so that the spoken words are more easily heard.
  • The sound changes between video clips: Such a change often sounds abrupt or harsh. I can reduce that by fading audio in at the beginning of the clip, and fading it out at the end. Studio has handy Fade In and Fade Out buttons, which automatically make fade adjustments to the audio rubberbands for a clip.
  • I can eliminate unwanted sounds from a clip: For example, the Scene 1 sample clip from the companion CD-ROM shows a motorcycle passing by the camera on a racetrack. But the beginning of the clip has the sound of another motorcycle that is actually behind the camera. I can eliminate the sound of that other off-camera motorcycle by dynamically adjusting volume as I’ve done in Figure.
Dynamic volume adjustment is where audio rubberbands really come in handy. Click once on a rubberband for one of your audio clips. When you click the rubberband, you’ll notice that a little dot appears. You can click-anddrag that dot up or down to adjust the volume of the clip. Not only can you place as many dots as you can squeeze onto a rubberband, you can also move those dots around on the rubberband to make constant adjustments throughout the clip. Like real rubberbands, audio rubberbands are stretchy and can be moved quite a bit, but unlike real rubberbands, they don’t snap back when you stop moving them. Play around a bit with the rubberbands to see just how fun volume adjustments can be!
Those little dots on audio rubberbands act like pins to hold the bands in place. If you want to get rid of a dot, click-and-drag it off the top or bottom of the clip. Twang! The dot will disappear and the rubberband will snap back into place.

Adjusting overall volume

on

Modifying the overall volume for an audio clip or a whole track is pretty simple, but the procedure varies a bit depending on which program you are using.
In Apple iMovie, follow these steps:
  1. Click a clip to select it. (To adjust multiple clips simultaneously, hold down the Ô key as you click each clip.) Be careful not to click the purple rubberband line. If you accidentally click the rubberband and a dot appears on the line, press Ô+Z to undo the change.
  2. With the desired clip(s) selected, adjust the Volume slider leftward to reduce volume or right to increase volume.
As you adjust the slider , you see the rubberband lines move up or down.
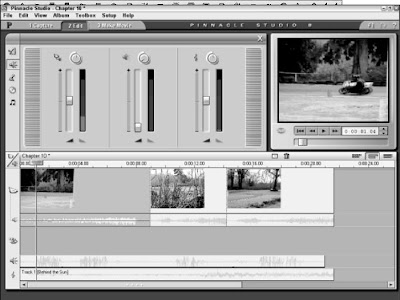
Pinnacle Studio provides a variety of volume controls in the audio toolbox, as you can see in Figure. To open this toolbox, click an audio clip in the timeline and choose Toolbox➪Change Volume. The toolbox contains a separate set of controls for each of the three audio tracks:
  • Left: Main audio track
  • Middle: Sound effects/narration track
  • Right: Background music track
To adjust the overall volume for an entire track, turn the knob at the top of the track’s volume controls. As you turn the knob, you see the blue audio rubberband line for the entire track move up or down in the timeline. If you want to adjust the volume for a specific clip, place the play head at the very beginning of that clip in the timeline and move the volume slider for that track up or down. Then place the play head at the end of the clip, and adjust the volume slider back to the middle to restore the volume of subsequent clips in the timeline.
You can also mute whole tracks in the timeline if you want. In iMovie, simply remove the check mark from the right side of the timeline next to the track you want to mute. In Studio, click the icon at the top of the volume controls in the audio toolbox to mute a given track.